Introduction
This documentation applies to version 2.1.1
Kuwaiba is an enterprise-ready network inventory platform geared towards the Telecommunications industry, but easily adaptable to other domains. It was designed to not only serve as an asset repository, but also to orchestrate complex business processes such as Service Provisioning, Activation, Modification and Termination, and to greatly speed the creation and integration of OSS (as in Operation Support Systems) applications.
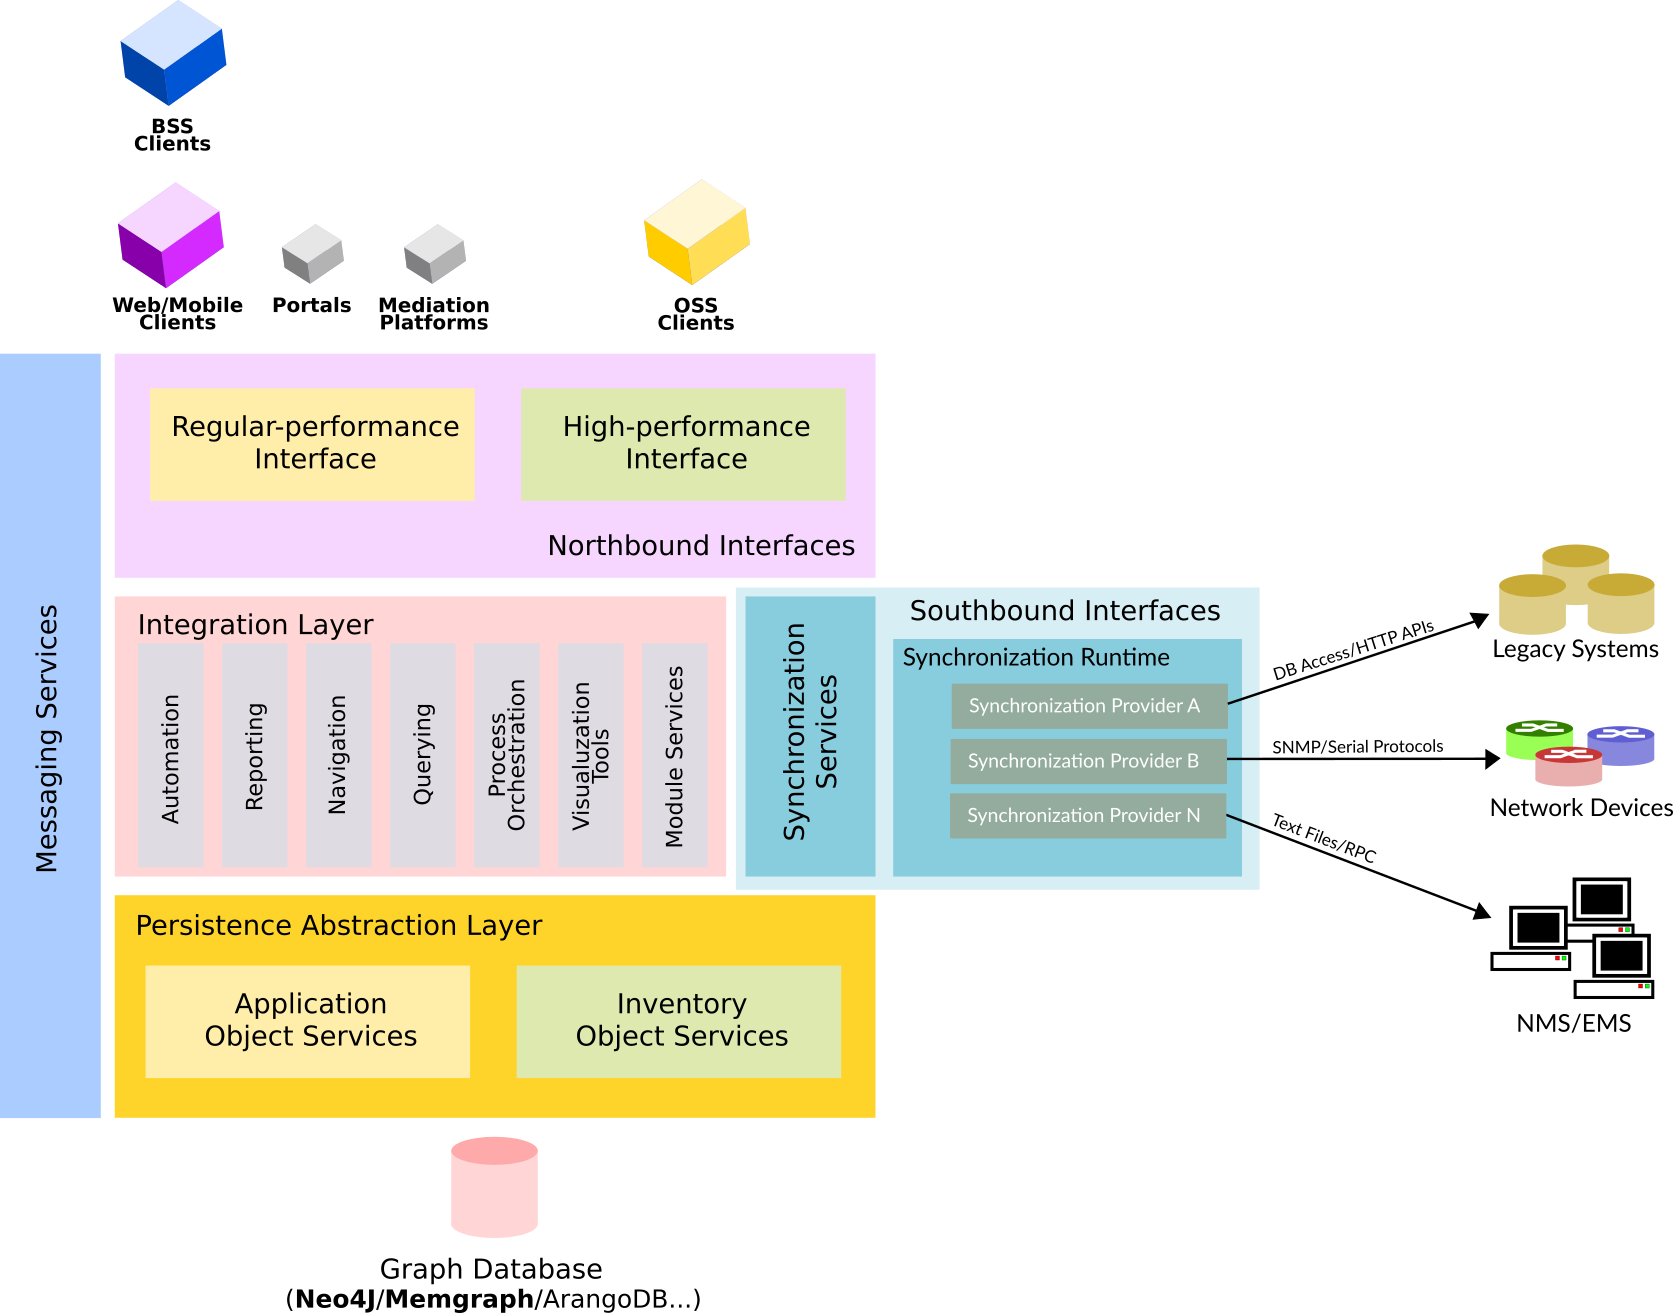
Kuwaiba’s architecture was designed with four principles in mind: modularity, scalability, extensibility and interoperability. In this section we will describe how all these elements play a role in the diagram above. Although initially Kuwaiba used a relational database (Oracle or Postgres), the technical team quickly realized that this was not the best way to model and store a telecommunications network, that’s why the decision of switching to a graph database was made. The Persistence Abstraction Layer makes the access to the database transparent to the rest of the application, so upper layers don’t know what kind of DBMS is being used. This layer defines a so-called Persistence API, whose reference implementation provides support for Neo4J, but support for other graph databases (or even non-graph ones too, though with a higher degree of complexity) can be added if needed. This API, defines a set of capabilities to manage inventory assets (network devices, infrastructure elements, etc) and application objects (users, reports, processes, automation, etc). On top of this layer, the Integration Layer manages the lifecycle and interactions of application modules (physical/logical connections, navigation, reporting, Outside Plant Management, external services, etc). The so-called Integration API makes the task of creating modules easy and painless. The modules access the inventory and application objects through the abstraction layer and push (and listen for) messages to the Messaging Services component, which is in charge of propagating the changes and informing the registered components of events in the system. The Integration Layer ensures the coexistence between core, open-source modules and commercial ones.
A separate component implements support for southbound interfaces, chiefly the Synchronization Framework, which is an extensible component that enables Kuwaiba to keep the inventory updated by fetching data from network devices, NMS and other information systems using a broad range of protocols, finding the differences with the information existing on the inventory, and finally conciliating the deltas according to business rules set by the customer. The synchronization process may require that (potentially) thousands or millions of devices to be queried, thus requiring to be highly scalable. The recollection process is performed by agents distributed throughout the network (o simply running on the same server depending on the scale of the operation). Integrations with new data sources can be done by creating the so-called Synchronization Providers, which implement the Synchronization API. More details about the Synchronization Framework can be found here.
The northbound interfaces allow Kuwaiba to talk to other higher-level systems, such as BSS platforms (ERPs, CRMs, etc) or OSS platforms (alarm/performance monitoring, billing, trouble ticketing, etc ) or simply to support the access from clients such as browsers, mobile or third-party clients. The load and response time requirements of both types of consumers, may make necessary to use different kinds of mechanisms to deliver the information required give the time restrictions under certain stress. To meet these needs, Kuwaiba provides so-called “regular-performance” interfaces (REST/SOAP webservices) which are more structured and implement more validations and procedures to ensure the security and integrity of the information, as well as “high-performance” interfaces, with less overhead and aimed do a lot of stuff in little time by keeping processing time to the bare minimum. At its core, Kuwaiba is a platform, that is, a piece of software that is meant for other components to be built on top of it. Kuwaiba may serve as an inventory system for other domains such as utilities, oil & gas or power transmission and distribution. It can be extended by creating domain-specific frontends which we call “Portals”, or UI-less mediation components (pieces of software that translate requirements from one domain to another).
Installation
Standalone
Requirements
Java Development Kit
JDK 11 is recommended, newer versions have not been tested and might not work. We recommend OpenJDK and it's available in most distros, however, if you are struggling to find the right version on your package repository, Several vendors offer pre-compiled builds (including Microsoft, Amazon and OpenLogic). We will use Amazon's JDK in this manual, but the instructions should apply to any other distribution. Unzip the installation package and copy it to your preferred location or install it using your package manager tools if a suitable installer is provider. This guide will assume you did the former.
The Server Application Bundle
Download the latest 2.1.x installation package from SourceForge. Let's take a look at the contents:
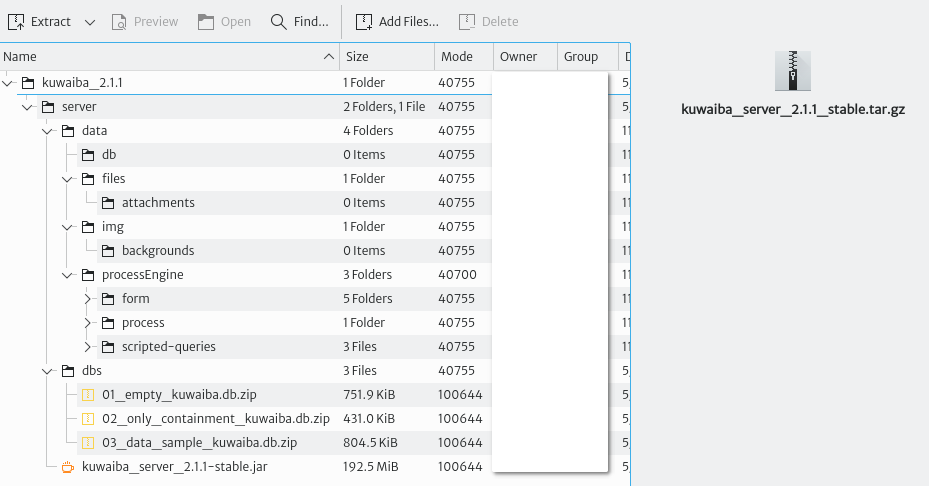
- data: Contains the directory structure where the database and other files are stored by default. This structure can be customized via configuration variables later. If you don't want to make changes to the default configuration, create the directory
/data, copy the contents ofdatainside, and make sure the user running Kuwaiba has read and write permissions. - dbs: Contains sample databases used to bootstrap the system. The
database 01is completely empty, save for the default data model. It has no containment structure, sample objects or list types. This database is recommended for those already familiar with the platform and those who are ready to run a production instance. Thedatabase 02is no longer maintained and will be most likely removed in the future. It contains the same as thedatabase 02plus a basic containment structure.The database 03is recommended for those willing to explore the features in Kuwaiba. It contains examples of several technologies, layouts, list types, validators, filters, configuration variables, topologies, views, reports and automated tasks, among many other goodies. - kuwaiba_server_2.1.x-stable.jar: This file is the actual application. It has an embedded Tomcat server, so you don't need any other third-party software to run it. The extension of this file is
.jar, but it's a regular.zipfile, and you can open it with the archive manager of your preference. Inside you will find all the stylesheets and images to change the appearance of the UI.
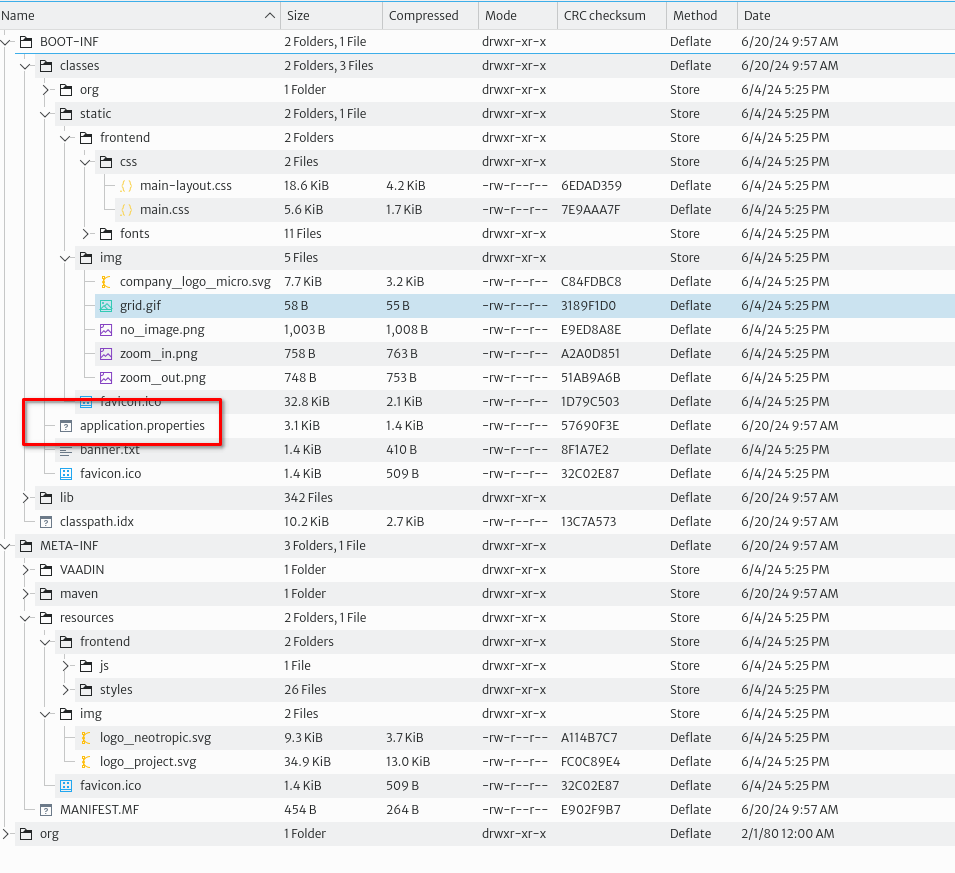
The most important file is application.properties. It contains several configuration variables that govern the behavior of Kuwaiba as shown in the table below. You can change the values to your convenience and pack the .jar file again (most archive managers will repack the file when you save the text file).
| Variable Name | Default Value | Description |
|---|---|---|
| server.port | 8080 | The port where the server will run. Note that this port is used to serve the UI, but it is different from that used to serve the web service |
| ws.port | 8081 | The port where the SOAP-based web service will listen |
| db.port | 6677 | Database port, if applicable. The default value is not the same default Neo4J's server port. Connections to this port from other hosts rather than localhost will be denied |
| spring.devtools.add-properties | false | Enable/disable Spring devtools. They're disabled automatically for all jar builds, but not for war files |
| general.corporate-logo | http://neotropic.co/img/logo_small.png | Corporate Logo URL. To be used primarily in reports and branding-related features |
| db.path | /data/db/kuwaiba.db | Database path |
| aem.backgrounds-path | /data/img/backgrounds | Path of the folder where background images for Object Views are saved |
| bem.attachments-path | /data/files/attachments | Path of the folder where files attached to inventory objects are stored |
| spring.scheduler.enabled | true | Enables/disables the job scheduler service |
Running the Server
The simplest method starts the server in foreground and logs in the standard output:
/path/to/java/installation/dir/bin/java -jar /path/to/kuwaiba/kuwaiba_server_2.1.x-stable.jar
The nohup command allows you to launch the server so that it is not terminated once you logout from the terminal. In this case, unless you redirect the output, the application will log to /home/<user>/nohup.out:
nohup /path/to/java/installation/dir/bin/java -jar kuwaiba_server_2.1-stable.jar&
In production environments it is highly recommended to create a special, restricted user to run the server. To run the server as that user, you can use the following command (application messages will be logged in /home/YOURUSER/nohup.out):
sudo runuser -u YOURUSER -- nohup /path/to/java/installation/dir/bin/java -jar kuwaiba_server_2.1-stable.jar&
Appendix B discusses how to configure the server to start on boot.
Deploying on an Existing Application Server
Requirements
| Tool | version |
|---|---|
| Java | 11 |
| Apache Tomcat | 9.0.37 |
Process Description
-
After you have installed Apache Tomcat in the requested version, generate the .war file of the project and place it in the
/webappsfolder inside tomcat. 1.1. If you want to set a specific path for the .war file when deploying. You can do this by modifying theserver.xmlfile as follows. It is important to set theautoDeployanddeployOnStartupattributes to false. Automatic deployment allows for easier management but also makes it easier for an attacker to deploy a malicious application. Only the contexts defined inserver.xmlwill be deployed and any changes will require a restart of Tomcat.<Host name="localhost" appBase="webapps" unpackWARs="true" autoDeploy="false" deployOnStartup="false"> <Context path="/kuwaiba" docBase="kuwaiba.war"/> <Context path="" docBase="sa.war"/> <Valve className="org.apache.catalina.valves.AccessLogValve" directory="logs" prefix="localhost_access_log" suffix=".txt" pattern="%h %l %u %t "%r" %s %b" /> </Host> -
Remove the default tomcat applications as these are unsafe applications from
/tomcat/webapps. -
If you need to create a management user, you can edit the
tomcat-users.xmlfile, usually located intomcat/conf. Note: It is important to limit access to users. Since some roles allow modifications to the deployed files or tomcat configurations. In case you find it necessary to create a user, make sure that their credentials are secure.
<role rolename="manager-status"/>
<role rolename="manager-jmx"/>
<role rolename="manager-script"/>
<user username="admin" password="admin123" roles="manager-status"/>
- After the above settings, you can start tomcat manually
./opt/tomcat/bin/startup.sh
Configure Tomcat as a Startup Task
- To configure tomcat as a startup task, you create a systemd service file in
/etc/systemd/system/tomcat.service:
Note: It is recommended to run Tomcat with a specific user for security reasons.
[Unit]
Description=Apache Tomcat Web Application Container
After=network.target

[Service]
Type=forking

Environment=JAVA_HOME=/route/java
Environment=CATALINA_HOME=/opt/tomcat/
ExecStart=/opt/tomcat/bin/startup.sh
ExecStop=/opt/tomcat/bin/shutdown.sh

User=tomcat user
Group=tomcat group
Restart=always

[Install]
WantedBy=multi-user.target
- After creating the service file, reload the systemd daemon so that it recognizes the new service:
sudo systemctl daemon-reload
Installation of Self-signed Certificates in Tomcat
- Modify the server.xml file as follows to use the self-signed certificate
<Connector port="8443" protocol="org.apache.coyote.http11.Http11NioProtocol"
           maxThreads="150" SSLEnabled="true">
    <SSLHostConfig>
        <Certificate certificateKeystoreFile="conf/certificate.jks"
        certificateKeystorePassword="certificate password"
        type="RSA" />
    </SSLHostConfig>
</Connector>
When restarting Tomcat and accessing https://localhost:8443/kuwaiba the browser will warn you that the certificate is untrusted, and you can then see the kuwaiba interface.
Configure User Permissions
If you run kuwaiba from apache tomcat with a specific tomcat user. You have to give read and write permissions to the tomcat user to some paths designated by kuwaiba.
/opt/tomcat/*/data/db/data/processEngine//data/files/attachments/data/img/backgrounds
Tomcat is added to your user's group. To allow your user access to the logs and files generated at runtime by the user tomcat.
sudo usermod -aG groupName tomcat
Then change the permissions so that users belonging to the same group can access the specified files.
sudo chmod -R g+rwx /data
In this way, Kuwaiba will be deployed to the address where the Tomcat server is running (port 8080, by default), as follows
Docker
Pulling the Image
For nightly builds (which are not really generated nightly, but at least once a week), use:
docker pull neotropic/kuwaiba:v2.1-nightly
Deployment
Starting the Container
The container exposes 2 ports: 8080 (application) and 8081 (SOAP-based web service). You can use the following command to run the container and map those ports to the host machine.
docker run -dp 8080-8081:8080-8081 --name kuwaiba-server neotropic/kuwaiba:v2.1-nightly
Now it's possible to access the application by going to http://localhost:8080/kuwaiba, or to access the SOAP-based web service API WSDL at http://localhost:8081/kuwaiba/KuwaibaService?wsdl
Using a Custom Database
To avoid losing information across containers when you update an image, you can mount a custom database (thus overriding the stock one) located in your host machine and reuse it in different containers:
docker run -dp 8080-8081:8080-8081 --name kuwaiba-server -v /path/to/your/custom/database:/data/db/kuwaiba.db neotropic/kuwaiba:v2.1-nightly
Make sure the user used to run the container has write access on /path/to/your/custom/database. You can download empty or sample databases from the Sourceforge repository
Additional Information
- Default Server Credentials: admin/kuwaiba. There are several other users used to showcase the Process Manager capabilities in
database 03. You can check them out in the User Manager module. Their passwords are alsokuwaiba. - Data Directory: /data
- Application Directory: /opt/programs
Generate Your Own Image
- Fetch the Dockerfile from the project repository on SourceForge. Alternatively, you can also download the docker compose file from the same repository
- Customize the Dockerfile depending on your needs.
- Build the image with:
docker build -t REPOSITORY_NAME:TAG .
where REPOSITORY_NAME is the name of the repository where the image will be placed and TAG is the tag for such container. Instead, you can also use the docker compose file like this:
docker compose -f kuwaiba.yaml up
Upgrading Database from Kuwaiba 2.1.1
Neo4j migration is the process of migrating an existing single deployment to a newer MAJOR version. Such migrations require a review of the Neo4j configurations.
Upgrading Database from Neo4j 3.5.x to 4.4.x
The database version 3.5.5 is used by Kuwaiba 2.1.1. If you wish to upgrade the database to migrate to newer versions of Kuwaiba, you must follow the Neo4j migration process from version 3.x.x to 4.4.x. This process can be performed using two methods:
-
Direct migration (Neo4j Enterprise Edition)
-
Sequential migration (Neo4j Community Edition)
The focus will be on the sequential migration process available for the community edition of Neo4j.
Sequential migration
Following the sequential patch migrate Neo4j deployment from 3.5.lastest to 4.0.lastest then sequentially upgrade it to 4.1.lastest, 4.2.lastest, 4.3.lastest and 4.4.lastest
Migration from Neo4j 3.5.5 to 3.5.12
During the migration process, we will work with the following directories:
$Neo4j_HOME: Refers to the directory of the currently installed Neo4j version (e.g., version 3.5.5).$New_Neo4j_HOME: Refers to the directory of the new Neo4j version to which the system will be upgraded (e.g., version 3.5.12).
Prepare Neo4j database 3.5.5
Debido a incompatibilidades en el proveedor de indices de Neo4j entre las versiones 3.5.5 y 3.5.12, antes de realizar la migración los indices deben ser eliminados y creados nuevamente una vez realice la migración para ello verifique los indices actuales. Inicie neo4j server running the following command: ($Neo4j_HOME/bin/neo4j start). This command starts the neo4j server, the server will be accessible at http://localhost:7474.
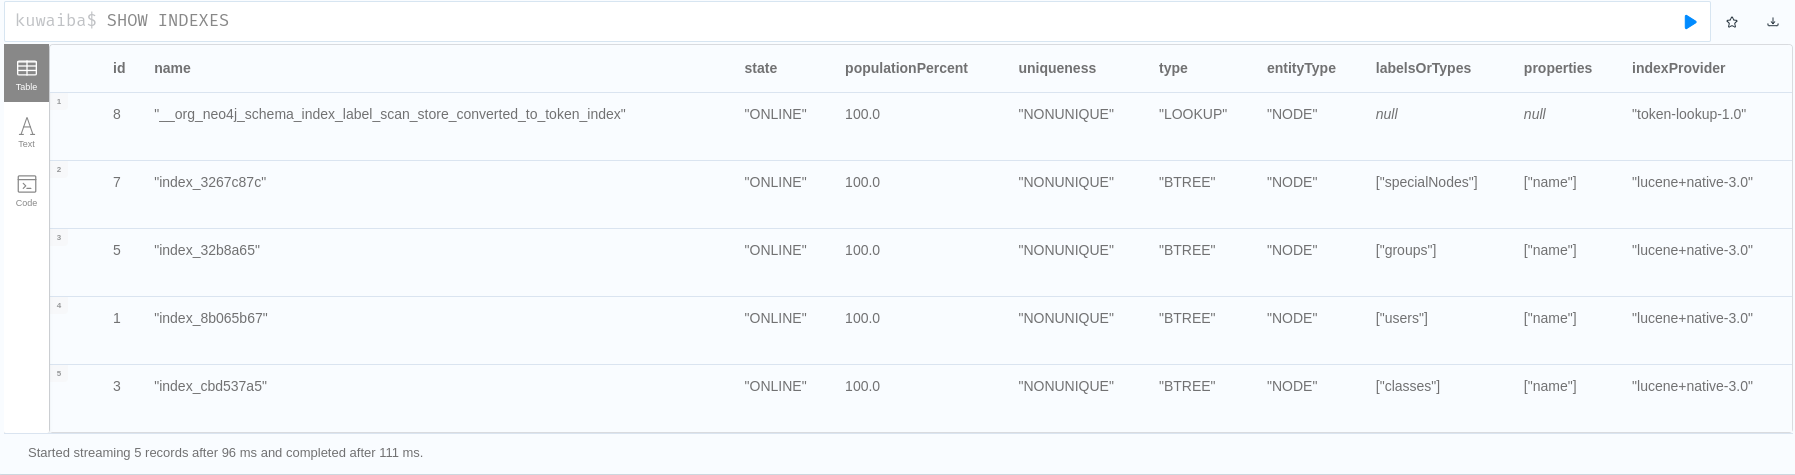
En la consola de Neo4j ejecute el comando :schema, el cual le permitirá visualizar los indices actualmente creados en la base de datos.
 |
|---|
| Figure 1. Show Index command |
Realice una copia de los indices actuales y preceda a eliminarlos ejecutando el comando
DROP INDEX ON :node_label(property);
Por ejemplo para eliminar el indice de la propiedad name del nodo con label clase ejecute
DROP INDEX ON :classes(name)
Migrate Database
We start the migration from neo4j-community-3.5.5 to 3.5.12, this due to compatibility issues from version 3.3.5 to 4.0.0.
-
Backup Current Database Files
Create a backup of your current database files located in$Neo4j_HOME/data. -
Install Neo4j Community Version 3.5.12
Download and install Neo4j Community 3.5.12. -
Copy and Replace the Data Folder
- Take the entire contents of the
datafolder (including thedatabasesanddbmsdirectories) from$Neo4j_HOME/data. - Copy these contents and paste them into the
$New_Neo4j_HOME/datafolder, replacing all its contents.
- Take the entire contents of the
-
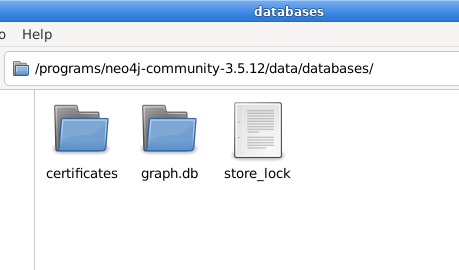
Rename the Database Folder
Rename your database folder tograph.dbwithin$New_Neo4j_HOME/data/databases/seen in Figure 2.
 |
|---|
| Figure 2. Replace and rename database |
-
Prepare the neo4j.conf In the file
neo4j.confinto the ($New_Neo4j_HOME/conf) uncomment the next lines:Set dbms.allow_upgrate=trueSet dbms.default_database=graph.db
-
Start migration Start the migration process by running the following command: ($New_Neo4j_HOME/bin/neo4j console). This command starts the database migration process and launches the Neo4j server. Once complete, the server will be accessible at http://localhost:7474.
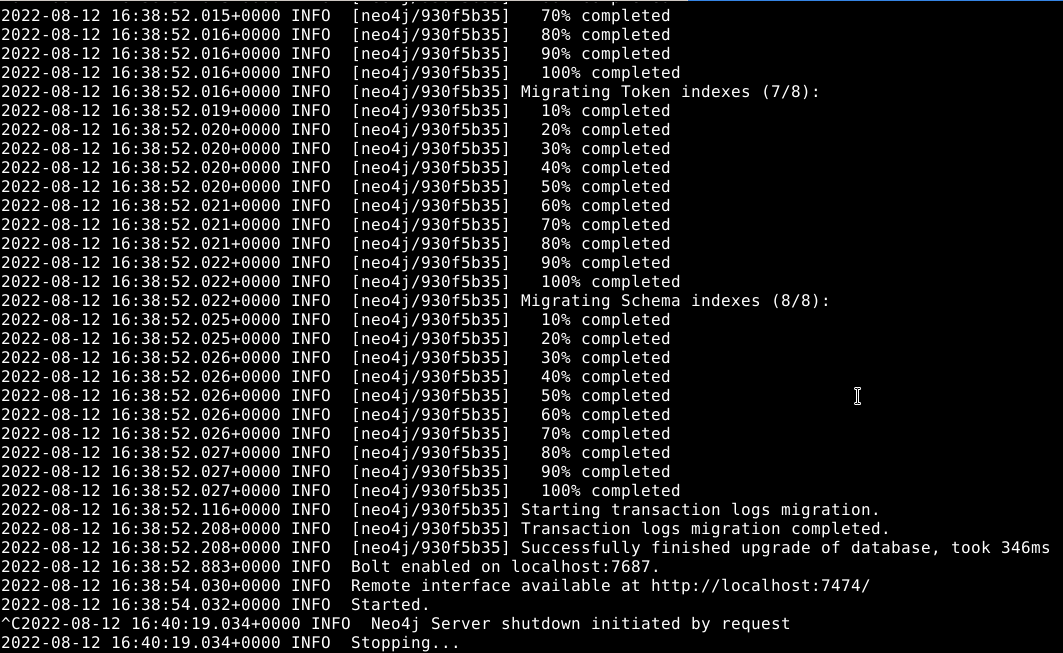 |
|---|
| Figure 3. Migration process |
- Stop the server Stop the server to continue the migration (Ctrl + C ).
Migration from 3.5.12 to 4.4.17
Once the database has been migrated to version 3.5.12, it is possible to migrate to version 4.4.17
Note: Before preparing for migration, it is essential to verify that Java 11 is installed. While Neo4j 3.5.x uses Java 8, upgrading to version 4.x.x requires Java 11 as a mandatory prerequisite.
During the migration process, we will work with the following directories:
$Neo4j_HOME: Refers to the directory of the currently installed Neo4j version (e.g., version 3.5.12).$New_Neo4j_HOME: Refers to the directory of the new Neo4j version to which the system will be upgraded (e.g., version 4.4.17).
-
Backup Current Database Files
Create a backup of your current database files located in$Neo4j_HOME/data. -
Install Neo4j Community Version 4.4.17
Download and install Neo4j Community 4.4.17. -
Copy and Replace the Data Folder
- Take the entire contents of the
datafolder (including thedatabasesanddbmsdirectories) from$Neo4j_HOME/data. - Copy these contents and paste them into the
$New_Neo4j_HOME/datafolder, replacing all its contents.
- Take the entire contents of the
-
Rename the Database Folder Rename your database folder to
neo4jwithin$New_Neo4j_HOME/data/databases/From this new version onwards we have the concept of multi databases andgraph.dbis not a valid name, the databases have to follow a naming convention and can not contain special characters including dots as seen in Figure 4.
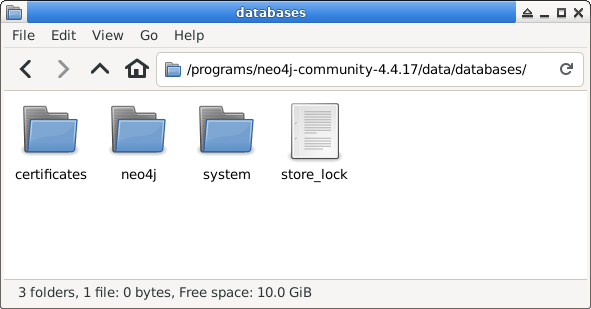 |
|---|
| Figure 4. New format databases |
-
Prepare the neo4j.conf In the file
neo4j.confinto the ($New_Neo4j_HOME/conf) uncomment the next lines:Set dbms.allow_upgrate=trueSet dbms.default_database=neo4j
-
Start migration Start the migration process by running the following command: ($New_Neo4j_HOME/bin/neo4j console). This command starts the database migration process and launches the Neo4j server. Once complete, the server will be accessible at http://localhost:7474.
-
Stop the server Stop the server to continue the migration (Ctrl + C ).
Once complete, run the server use ($New_Neo4j_HOME/bin/neo4j start).
 |
|---|
| Figure 5. Neo4j server version 4.4.17 |
Upgrading Database from Neo4j 4.4.17 to 5.26.1
The migration to Neo4j version 5.x.x is only possible from version 4.4.x. The migration process of Neo4j from version 4.4.x to 5.26.1 is possible through two methods:
-
Using Backups command (Neo4j Enterprise Edition)
-
Through Backup Dump command (Neo4j Community Edition)
The focus will be on the Backup Dump Command process available for the community edition of Neo4j.
Backup Dump Migration
Note: Before you start preparing for migration , it is very important verify that you have installed Java 17 because under Neo4j 5.x.x Java 17 is used, when you upgrade to 5.x.x it has a hard requirement on Java 17.
During the migration process, we will work with the following directories:
$Neo4j_HOME: Refers to the directory of the currently installed Neo4j version (4.4.17 - JAVA 11).$New_Neo4j_HOME: Refers to the directory of the new Neo4j version to which the system will be upgraded (5.26.1 - JAVA 17).
Prepare database
Before performing the migration, it is necessary to make changes to the database to ensure compatibility with Neo4j 5.
Create Index
Since the index system used in the major versions of Neo4j has been modified in version 5.x.x, it is necessary to create new indexes for those previously removed in prepare database 3.5.5. In Neo4j versions 4.1.x, the indexes are of type BTREE, which has been replaced in version 5.x.x with RANGE, POINT, and TEXT types.
- Range indexes: Neo4j’s default index. Supports most types of predicates.
- Text indexes: solves predicates operating on STRING values. Optimized for queries filtering with the STRING operators CONTAINS and ENDS WITH.
- Point indexes: solves predicates on spatial POINT values. Optimized for queries filtering on distance or within bounding boxes.
- Token lookup indexes: only solves node label and relationship type predicates (i.e. they cannot solve any predicates filtering on properties). Two token lookup indexes (one for node labels and one for relationship types) are present when a database is created in Neo4j.
Start the process by checking the current indexes in the database using the Neo4j console, run ($Neo4j_HOME/bin/neo4j start) and use the (SHOW INDEXES) command. This command will display the existing indexes as seen in the Figure 6. Review this information and create the new indexes according to their respective types.
 |
|---|
| Figure 6. SHOW INDEXES Command |
To create indexes in the Neo4j console, use the following command:
CREATE index_type INDEX new_index_name FOR (n:label) ON (n.property)
For example, to create a TEXT index to property name and label special nodes:
CREATE TEXT INDEX text_index_specialNodes_name FOR (n:specialNodes) ON (n.name)
Once the indexes have been created, verify that they are online, and then proceed to delete obsolete BTREE indexes using the following command in the Neo4j console: DROP INDEX index_name
Backup Database
To ensure data security during the migration process, a backup of the database is performed by generating a .dump file using the following command:
$Neo4j_HOME/bin/neo4j-admin dump --database=database_name --to=/path-to-file/file.dump
In this example: $Neo4j_HOME/bin/neo4j-admin dump --database=kuwaiba --to=/neo4j/migration/kuwaiba.dump
Install Neo4j 5
Download the last Neo4j Server 5.x.x version, actually current version is 5.26.1.
Migrate the Neo4j configuration file
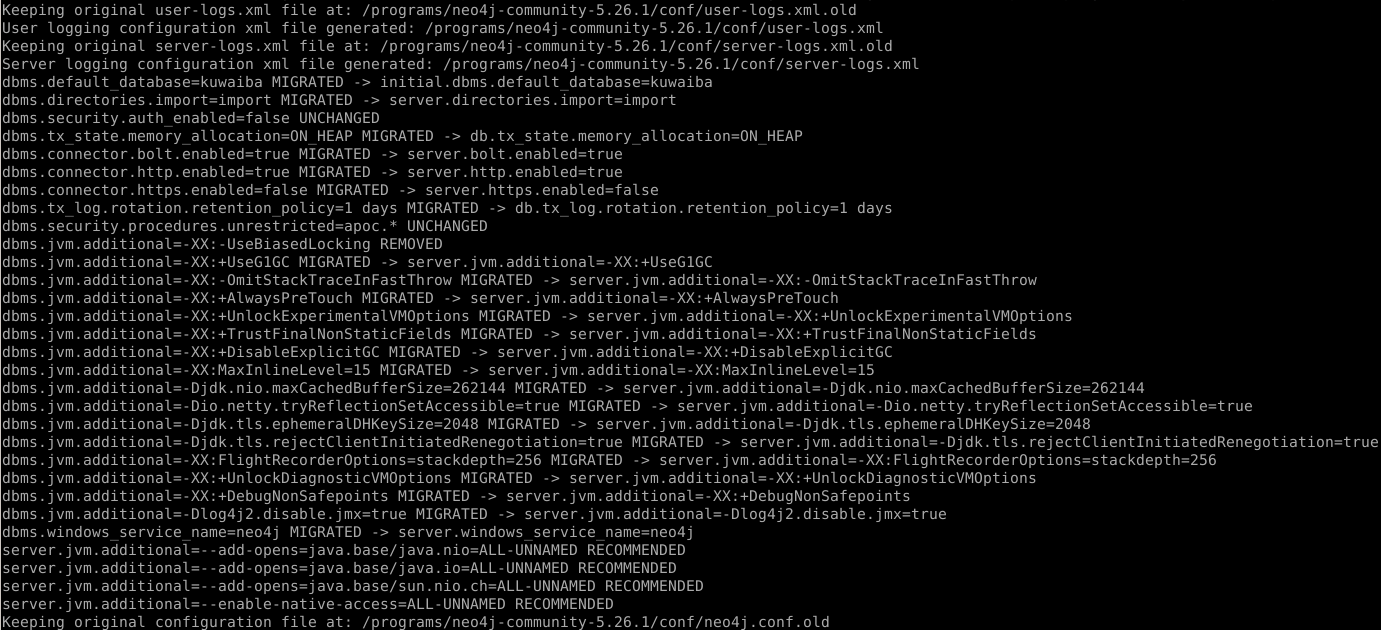
Starting from version 5.x.x, it is possible to migrate the Neo4j configuration from version 4.4.x. To do so, use the following command:
New_Neo4j_HOME/bin/neo4j-admin server migrate-configuration --from-path=/$Neo4j_HOME/conf --to-path=/$New_Neo4j_HOME/conf/
Note: To execute the Neo4j 5.x.x version requirement Java 17.
 |
|---|
| Figure 7. Migrate configuration command |
Once the configuration migration is complete as seen in Figure 7, the default configuration of Neo4j 5 will be saved in New_Neo4j_HOME/conf/neo4j.conf.old in case you wish to restore it.
Verify that in New_Neo4j_HOME/conf the file neo4j.conf has the following configuration or else add it:
Uncomment and set dbms.allow_upgrate=trueUncomment and set initial.dbms.default_database=kuwaiba
Migrate Database
Once Neo4j Server 5.x.x is installed and configured, we proceed to migrate the database. To do so, we use the following command, which will load and adjust the database to version 5.x.x:
New_Neo4j_HOME/bin/neo4j-admin database load --from-path=/path/to/dump/ file dump_file_name
In this example:
New_Neo4j_HOME/bin/neo4j-admin database load --from-path=/neo4j/migration/ kuwaiba
If there is already a database in New_Neo4j_HOME/data with the same name as the one you wish to migrate, use the --overwrite-destination=true flag to replace it.
If additional configurations are required for the migration, refer to the options available for Neo4j version 5.x.x.
 |
|---|
| Figure 8. Warning migrating database |
When migrating the database as seen in Figure 8, a warning will appear indicating that the storage format is deprecated. This is because, starting with Neo4j version 5.x.x, the storage format was changed. However, the format change is not possible directly from version 4.4.x, as this update was introduced in later versions.
Chance Store Format
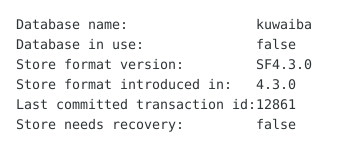
The storage format describes how information is written to disk. Starting with version 5.x.x, the supported formats include block, aligned, standard and high_limit. For the Community edition of Neo4j, the recommended format is aligned, so we will proceed to change it. Before doing so, you can check the current database format in version 4.4.x using the following command:
$Neo4j_HOME/bin/neo4j-admin store-info $Neo4j_HOME/data/databases/data_base_name
 |
|---|
| Figure 9. Neo4j 4.4.17 store format |
As can be seen in Figure 9, the storage format in version 4.4.17 is SF4.3.0, not compatible with 5.xx, we proceed to change the format with:
New_Neo4j_HOME/bin/neo4j-admin database migrate --to-format=store_format data_base_name
In this example:
New_Neo4j_HOME/bin/neo4j-admin database migrate --to-format=aligned kuwaiba
 |
|---|
| Figure 10. Migrate completed |
As shown in Figure 10, this concludes the migration process from Neo4j 4.4.17 to 5.26.1. To run the server, use the following command: $New_Neo4j_HOME/bin/neo4j start
 |
|---|
| Figure 11. Warning migrating database |
Appendix A. Securing the Server
- Make sure the user running the server only has access to the data directories and has as little other privileges as possible. Also, disable its shell access as instructed in the installation section.
- Install a firewall (ufw works pretty well) and restrict access to non-necessary ports.
- Disable SSH user/password authentication and favor key-based authentication.
Appendix B. Starting the Server on Boot
The following instructions apply to systemd-enabled distros, particularly Debian 11+. This is not a guide on how to create services in systemd, just a sample of what most production scenarios would require to run Kuwaiba on boot.
-
Create a file in
/etc/systemd/system/namedkuwaiba.service -
Paste the following lines inside:
[Unit]
Description= Kuwaiba Open Network Inventory
After=network.target

[Service]
User=kuwaiba
ExecStart=nohup /usr/bin/java -jar /path/file/kuwaiba_server_2.1.x-stable.jar
SuccessExitStatus=143
TimeoutStopSec=10
Restart=on-failure
RestartSec=5

[Install]
WantedBy=multi-user.target
Note
Make sure that the
Userfield is set to the user that will be used to run the server. Also, double-check theExecStartcommand syntax before saving. -
Reload the service definitions
sudo systemctl daemon-reload -
Start and enable the service
sudo systemctl start program-name sudo systemctl enable program-name -
Verify the service status
sudo systemctl status program-name
Schedule Automatic Database Backup
The instructions below show an example of how to perform automatic backups of the Kuwaiba database. It applies to Linux distributions, specifically Debian 11.
-
Create a file named
kuwaiba_database_backup.sh -
Copy the following lines inside.
#!/bin/bash

# Define the paths
NEO4J_DIR="/data/db/kuwaiba.db"
BACKUP_DIR="/data/backups/"
TIMESTAMP=$(date +"%Y%m%d_%H%M%S")
BACKUP_PATH="${BACKUP_DIR}backup-${TIMESTAMP}_kuwaiba.db.tar.gz"

# Ensure the backup directory exists
mkdir -p "$BACKUP_DIR"

# Create a tarball of the Neo4j data directory
tar -czvf "$BACKUP_PATH" "$NEO4J_DIR"

# Optional: Remove backups older than 7 days
find "$BACKUP_DIR" -type f -name "*.tar.gz" -mtime +7 -exec rm {} \;
This script creates a backup of the Kuwaiba database and saves it in
BACKUP_DIR. In addition, it deletes backups that have a creation date older than 7 days. -
Give execution permissions to the above script.
chmod +x /path/to/your/bash-script.sh -
Schedule the task in Linux. To do this, use crontab.
crontab -e0 0 * * * /path/to/your/bash-script.sh
Appendix C. Using a Reverse Proxy
Adding a reverse proxy with Nginx in front of Kuwaiba can provide several benefits:
- Redirecting the traffic from standard HTTP/HTTPS ports 80/443 to 8080 allows a non-privileged user to run Kuwaiba
- Security: Nginx can help protect Kuwaiba by hiding its internal structure and adding an additional layer of security.
- Load Balancing: If you have multiple instances of Kuwaiba, Nginx can distribute the load among them.
This configuration is for Debian, but it should work for any derivative distribution like Ubuntu.
-
Install Nginx:
Update you repository index, then install Nginx:
sudo apt updatesudo apt install nginxNote
This step is optional. If applicable, allow access to Nginx through your firewall using the following command:
sudo ufw allow 'Nginx HTTP'
Verify that Nginx is running:
systemctl status nginxOutput ● nginx.service - A high performance web server and a reverse proxy server Loaded: loaded (/lib/systemd/system/nginx.service; enabled; vendor preset: enabled) Active: active (running) since Mon 2022-08-29 06:52:46 UTC; 39min ago Docs: man:nginx(8) Main PID: 9919 (nginx) Tasks: 2 (limit: 2327) Memory: 2.9M CPU: 50ms CGroup: /system.slice/nginx.service ├─9919 "nginx: master process /usr/sbin/nginx -g daemon on; master_process on;" └─9920 "nginx: worker process -
Edit your Server Block:
Create and open a new Nginx configuration file using nano or your preferred text editor:
sudo nano /etc/nginx/sites-available/kuwaibaInsert the following text into your new file:
     server {
         listen 80;
         listen [::]:80;

         server_name localhost; # Replace 'localhost' with your FQDN if available

         location / {
             proxy_pass http://YOUR_IP_ADDRESS:PORT; # Replace PORT with the port Kuwaiba is running on (default is 8080, but could be different if the default settings were changed)
             include proxy_params;
         }
     }
Next, enable this configuration file by creating a link from it to the sites-enabled directory that Nginx reads at startup:
sudo ln -s /etc/nginx/sites-available/kuwaiba /etc/nginx/sites-enabled/You can now test your configuration file for syntax errors:
sudo nginx -tWith no problems reported, restart Nginx to apply your changes:
sudo systemctl restart nginx -
Run Kuwaiba and open your browser:
localhost/kuwaiba
Appendix D. Accessing the Database
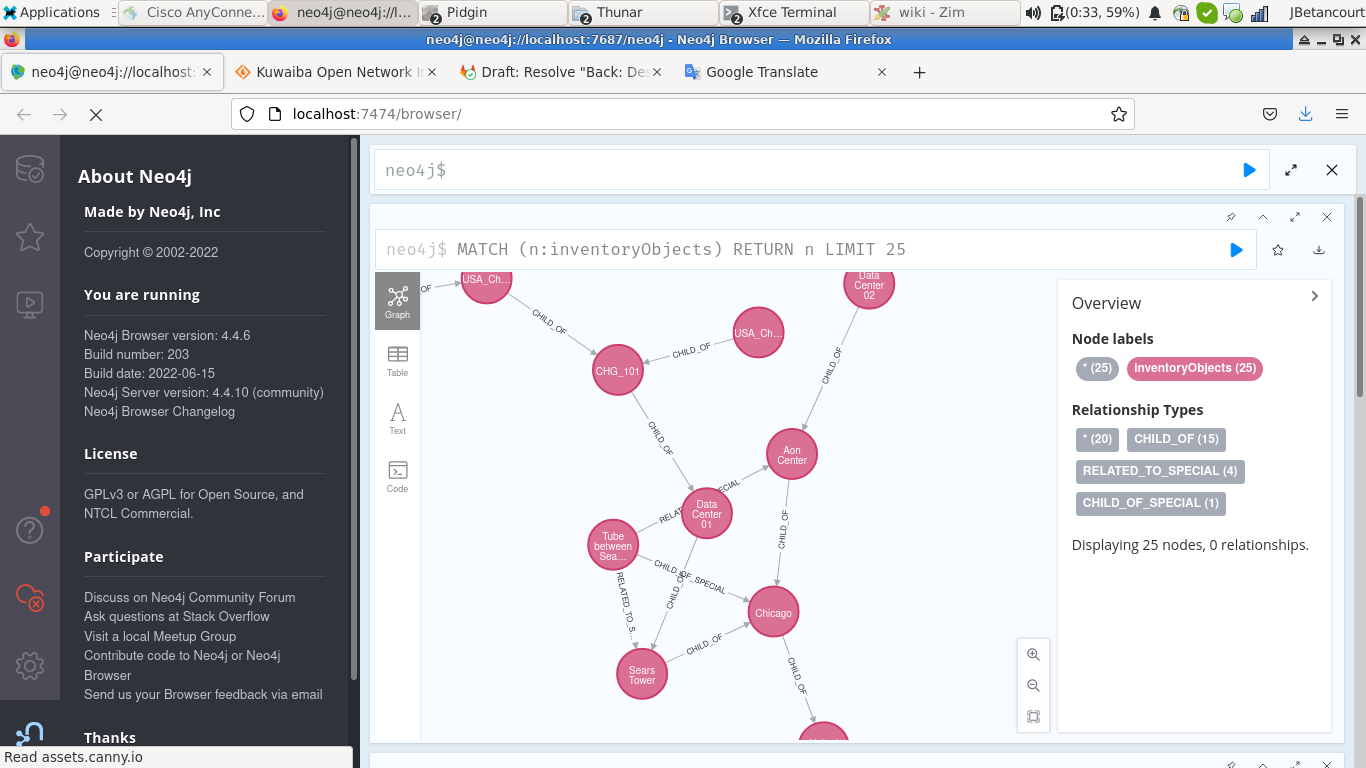
The reference implementation of the Persistence API (the layer in Kuwaiba that abstracts the access to the database, so changing the DMBS is transparent to upper layers) in Kuwaiba 2.1.1 uses Neo4J 3.5.5. You can make your own implementation to support other backends, and the project actually intends to support other graph databases in the mid-term. In this reference implementation, Neo4J works in embedded mode, which means that a mini database server runs on the same virtual machine as the application. This provides important performance improvements, but somehow limits the scalability of the system, so the current development version of Kuwaiba (2.5) will drop its support in favor of a more scalable serve mode. If you want to access the database directly, you can only do it from the same machine the server is running, as external connections are refused in embedded mode. This can be fixed by using an SSH tunnel, as we will see later. Having said that, we will review the procedure to connect the official Neo4J browser to the database of a running instance of Kuwaiba.
The Neo4J server includes a javascript client that works just fine and never fails to connect. We will extract it from the standard installer and use it on a regular browser:
-
Download Neo4J 3.5. Neo Technologies goes through great lengths to hide the open source versions behind several "Get Our Cloud/Enterprise Products" pages. The actual download page is this one. Neo Technologies also remove older versions of their products (Kuwaiba 2.5 uses Neo4J 4.4). Thankfully, the download link is composed by the name of the version, so we can infer it from the other downloads.
-
Inside the file, go to
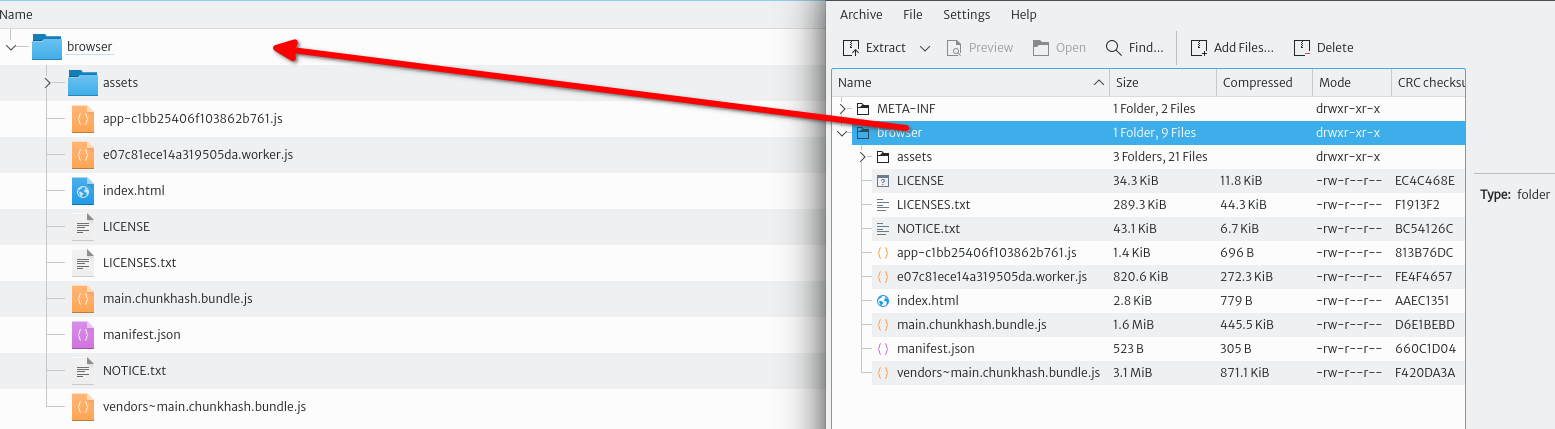
liband search for the fileneo4j-browser-3.2.18.jar. Jar are simple .zip files with another extension. Unzip that file. -
The client application is inside a folder called
browseras shown in the picture below. Openindex.htmlwith your preferred browser.
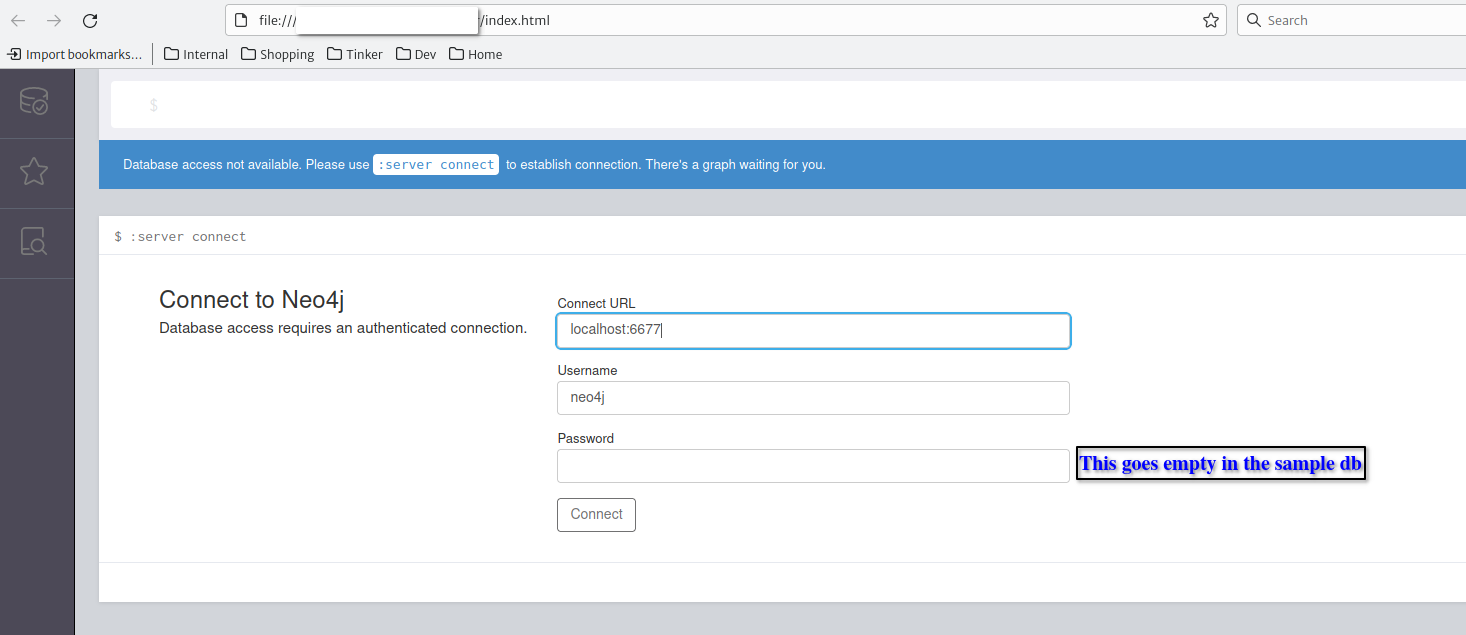
- This will open a log in page. Use
localhost:6677in the Connect URL field and leave the password empty.
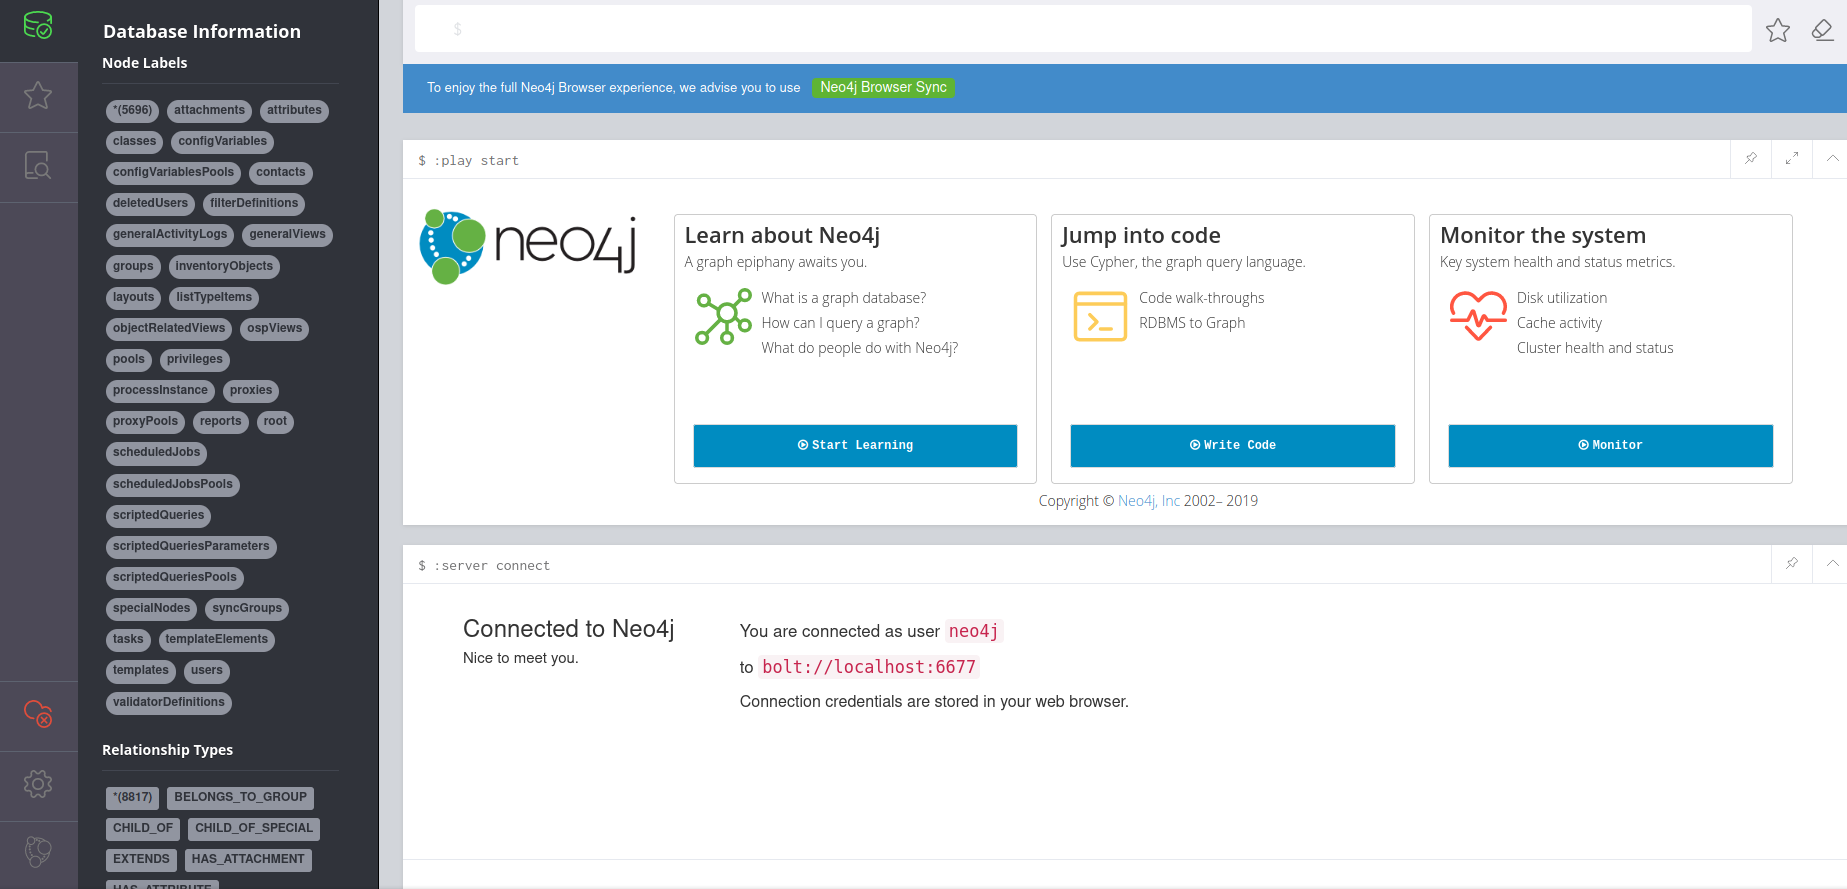
- Verify it worked if the left panel shows all the labels and relationship types. You are ready to start executing cypher queries in the text field at the top.
Note
You can use a copy of the Kuwaiba database and use it on an actual N4J server and run tests without disturbing the inventory application.
Appendix E. Generating and configuring a self-signed SSL certificate
Digital certificates are an essential part of internet security. They function as electronic identifications that guarantee the authenticity and security of communications on the network. These certificates, issued by a Certificate Authority (CA), contain public and private keys used to encrypt and decrypt data, ensuring that information exchanged between a server and a client cannot be intercepted or altered.
In the context of web applications, digital certificates allow secure connections to be established using the HTTPS (HyperText Transfer Protocol Secure) protocol. This ensures that data transmitted between the user's browser and the web server is protected from malicious attacks. To configure HTTPS on a web server, you need to implement an SSL (Secure Sockets Layer) certificate, which is stored in a keystore, a secure container for keys and certificates.
In addition to certificates issued by a CA, there are also self-signed certificates. These digital certificates are signed by the same entity that creates them, rather than by a CA, which will be the type we are going to implement.
-
Create the Certificate Authority (CA) Private Key:
Create a private key in the desired location. In this example, it was created in the root directory within a folder named
certificate:mkdir certificate cd certificateopenssl genrsa -out CA.key -des3 2040Enter a password for each time you export or sign a certificate:
    ● Output:
        Enter PEM pass phrase:
        Verifying - Enter PEM pass phrase:
Note
Whenever you are asked for a password, use the same password to avoid confusion.
-
Export the certificate as a PEM format:
openssl req -x509 -sha256 -new -nodes -days 3650 -key CA.key -out CA.pemEnter your password and the requested information:
Note
The requested fields can be left empty
● Output: Enter pass phrase for CA.key: You are about to be asked to enter information that will be incorporated into your certificate request. What you are about to enter is what is called a Distinguished Name or a DN. There are quite a few fields but you can leave some blank For some fields there will be a default value, If you enter '.', the field will be left blank. ----- Country Name (2 letter code) [AU]:CO State or Province Name (full name) [Some-State]:POPAYAN Locality Name (eg, city) []:POPAYAN Organization Name (eg, company) [Internet Widgits Pty Ltd]:Neotropic SAS Organizational Unit Name (eg, section) []:TI Department Common Name (e.g. server FQDN or YOUR name) []:neotropic.co Email Address []: -
Create and Sign a Domain Certificate:
Create a Directory for the Domain inside folder
certificate:mkdir neotropic.co cd neotropic.coGenerate a Private Key for the Domain:
openssl genrsa -out neotropic.co.key -des3 2048Enter a password:
    ● Output:
        Enter PEM pass phrase:
        Verifying - Enter PEM pass phrase:
Create an extension configuration file:
touch neotropic.co.extEdit
neotropic.co.extwith your preferred editor and add the following content:authorityKeyIdentifier = keyid,issuer basicConstraints = CA:FALSE keyUsage = digitalSignature, nonRepudiation, keyEncipherment, dataEncipherment subjectAltName = @alt_names [alt_names] DNS.1 = neotropic.co IP.1 = 192.168.0.11Generate a Certificate Signing Request (CSR):
openssl req -new -key neotropic.co.key -out neotropic.co.csrEnter your password and the requested information:
Note
The requested fields can be left empty except for (
A challenge password [ ]:YOUR_PASSWORD)● Output: Enter pass phrase for neotropic.co.key: You are about to be asked to enter information that will be incorporated into your certificate request. What you are about to enter is what is called a Distinguished Name or a DN. There are quite a few fields but you can leave some blank For some fields there will be a default value, If you enter '.', the field will be left blank. ----- Country Name (2 letter code) [AU]: State or Province Name (full name) [Some-State]: Locality Name (eg, city) []: Organization Name (eg, company) [Internet Widgits Pty Ltd]: Organizational Unit Name (eg, section) []: Common Name (e.g. server FQDN or YOUR name) []: Email Address []: Please enter the following 'extra' attributes to be sent with your certificate request A challenge password []:neotropic An optional company name []:Sign the certificate request (
neotropic.co.csr) using the CA certificate (CA.pem) and private key (CA.key). This will generate a new certificate (neotropic.co.crt):openssl x509 -req -in neotropic.co.csr -CA ../CA.pem -CAkey ../CA.key -CAcreateserial -days 3650 -sha256 -extfile neotropic.co.ext -out neotropic.co.crtEnter a password:
● Output: Certificate request self-signature ok subject=C = AU, ST = Some-State, O = Internet Widgits Pty Ltd Enter pass phrase for ../CA.key: -
Convert to PKCS12 Format:
Export the certificate and private key to PKCS12 format:
openssl pkcs12 -export -in neotropic.co.crt -inkey neotropic.co.key -out neotropic.co.p12 -name defaultEnter your password:
● Output: Enter pass phrase for neotropic.co.key: Enter Export Password: Verifying - Enter Export Password: -
Update kuwaiba application properties:
Change the application port in application properties:
server.port=8443Add the following content to your application properties:
server.ssl.key-store=file:/route/to/your/p12/file/neotropic.co.p12 server.ssl.key-store-password=YOUR_PASSWORD #Password that you wrote in " A challenge password [ ] " server.ssl.key-store-type=PKCS12 server.ssl.client-auth=none -
Run Kuwaiba and open your browser:
https://localhost:8443/kuwaiba/Click on the following button (
you can also view the url with https):
Click on (
Connection not secure) and then on (More information) and you will see the following information:Click on (
View certificate):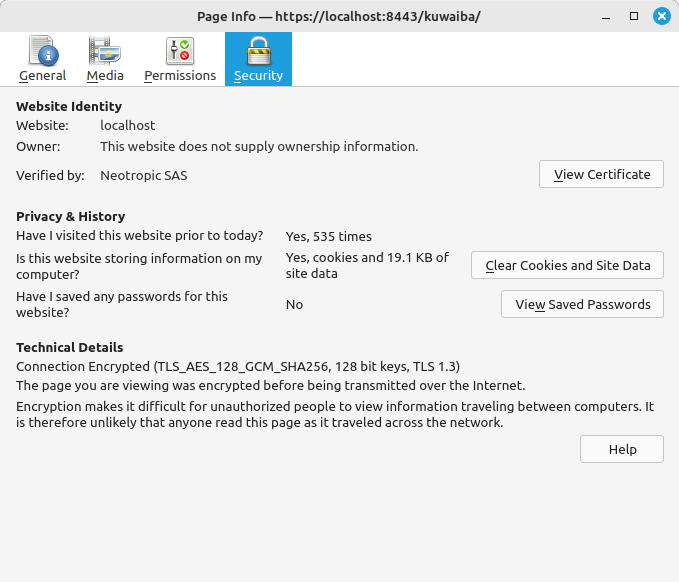
Your certificate:

Appendix F. Configuring the Max Attachment Size
An attachment is a file directly associated with an inventory object or a list-type item (which in turn will be linked to several objects e.g. a router installation manual file attached to a list type item representing its model will be available to all routers of said model). These files can be documents, images or relevant settings, and can be downloaded, added or deleted at any moment.
To ensure that the storage endpoint used to store the files won't be abused or overwhelmed, the attachments size limit is capped and configurable.
Note
The value is specified in MB, and you only need to adjust this value as needed. The default value is 10 MB.
Open your application.properties file and modify the following lines:
-
Set the max file size at application server level. This property sets the maximum size for individual files that can be uploaded.
spring.servlet.multipart.max-file-size=10MB -
Set the max (HTTP) request size at application server level. This property sets the maximum size for the entire multipart request.
spring.servlet.multipart.max-request-size=10MBNote
Maximum File Size and Maximum Request Size should be configured in accordance with the Maximum Attachment Size, as explained in the next step.
-
Set the max file size at application level. This property sets the maximum allowed size for attachments within the application. This restriction will apply to all Persistence API calls related to attachment handling, regardless if they are consumed through the northbound interfaces or automation procedures (such as tasks in the Task Manager).
bem.max-attachment-size=10