Appendix E. Generating and configuring a self-signed SSL certificate
Digital certificates are an essential part of internet security. They function as electronic identifications that guarantee the authenticity and security of communications on the network. These certificates, issued by a Certificate Authority (CA), contain public and private keys used to encrypt and decrypt data, ensuring that information exchanged between a server and a client cannot be intercepted or altered.
In the context of web applications, digital certificates allow secure connections to be established using the HTTPS (HyperText Transfer Protocol Secure) protocol. This ensures that data transmitted between the user's browser and the web server is protected from malicious attacks. To configure HTTPS on a web server, you need to implement an SSL (Secure Sockets Layer) certificate, which is stored in a keystore, a secure container for keys and certificates.
In addition to certificates issued by a CA, there are also self-signed certificates. These digital certificates are signed by the same entity that creates them, rather than by a CA, which will be the type we are going to implement.
-
Create the Certificate Authority (CA) Private Key:
Create a private key in the desired location. In this example, it was created in the root directory within a folder named
certificate:mkdir certificate cd certificateopenssl genrsa -out CA.key -des3 2040Enter a password for each time you export or sign a certificate:
    ● Output:
        Enter PEM pass phrase:
        Verifying - Enter PEM pass phrase:
Note
Whenever you are asked for a password, use the same password to avoid confusion.
-
Export the certificate as a PEM format:
openssl req -x509 -sha256 -new -nodes -days 3650 -key CA.key -out CA.pemEnter your password and the requested information:
Note
The requested fields can be left empty
● Output: Enter pass phrase for CA.key: You are about to be asked to enter information that will be incorporated into your certificate request. What you are about to enter is what is called a Distinguished Name or a DN. There are quite a few fields but you can leave some blank For some fields there will be a default value, If you enter '.', the field will be left blank. ----- Country Name (2 letter code) [AU]:CO State or Province Name (full name) [Some-State]:POPAYAN Locality Name (eg, city) []:POPAYAN Organization Name (eg, company) [Internet Widgits Pty Ltd]:Neotropic SAS Organizational Unit Name (eg, section) []:TI Department Common Name (e.g. server FQDN or YOUR name) []:neotropic.co Email Address []: -
Create and Sign a Domain Certificate:
Create a Directory for the Domain inside folder
certificate:mkdir neotropic.co cd neotropic.coGenerate a Private Key for the Domain:
openssl genrsa -out neotropic.co.key -des3 2048Enter a password:
    ● Output:
        Enter PEM pass phrase:
        Verifying - Enter PEM pass phrase:
Create an extension configuration file:
touch neotropic.co.extEdit
neotropic.co.extwith your preferred editor and add the following content:authorityKeyIdentifier = keyid,issuer basicConstraints = CA:FALSE keyUsage = digitalSignature, nonRepudiation, keyEncipherment, dataEncipherment subjectAltName = @alt_names [alt_names] DNS.1 = neotropic.co IP.1 = 192.168.0.11Generate a Certificate Signing Request (CSR):
openssl req -new -key neotropic.co.key -out neotropic.co.csrEnter your password and the requested information:
Note
The requested fields can be left empty except for (
A challenge password [ ]:YOUR_PASSWORD)● Output: Enter pass phrase for neotropic.co.key: You are about to be asked to enter information that will be incorporated into your certificate request. What you are about to enter is what is called a Distinguished Name or a DN. There are quite a few fields but you can leave some blank For some fields there will be a default value, If you enter '.', the field will be left blank. ----- Country Name (2 letter code) [AU]: State or Province Name (full name) [Some-State]: Locality Name (eg, city) []: Organization Name (eg, company) [Internet Widgits Pty Ltd]: Organizational Unit Name (eg, section) []: Common Name (e.g. server FQDN or YOUR name) []: Email Address []: Please enter the following 'extra' attributes to be sent with your certificate request A challenge password []:neotropic An optional company name []:Sign the certificate request (
neotropic.co.csr) using the CA certificate (CA.pem) and private key (CA.key). This will generate a new certificate (neotropic.co.crt):openssl x509 -req -in neotropic.co.csr -CA ../CA.pem -CAkey ../CA.key -CAcreateserial -days 3650 -sha256 -extfile neotropic.co.ext -out neotropic.co.crtEnter a password:
● Output: Certificate request self-signature ok subject=C = AU, ST = Some-State, O = Internet Widgits Pty Ltd Enter pass phrase for ../CA.key: -
Convert to PKCS12 Format:
Export the certificate and private key to PKCS12 format:
openssl pkcs12 -export -in neotropic.co.crt -inkey neotropic.co.key -out neotropic.co.p12 -name defaultEnter your password:
● Output: Enter pass phrase for neotropic.co.key: Enter Export Password: Verifying - Enter Export Password: -
Update kuwaiba application properties:
Change the application port in application properties:
server.port=8443Add the following content to your application properties:
server.ssl.key-store=file:/route/to/your/p12/file/neotropic.co.p12 server.ssl.key-store-password=YOUR_PASSWORD #Password that you wrote in " A challenge password [ ] " server.ssl.key-store-type=PKCS12 server.ssl.client-auth=none -
Run Kuwaiba and open your browser:
https://localhost:8443/kuwaiba/Click on the following button (
you can also view the url with https):
Click on (
Connection not secure) and then on (More information) and you will see the following information:Click on (
View certificate):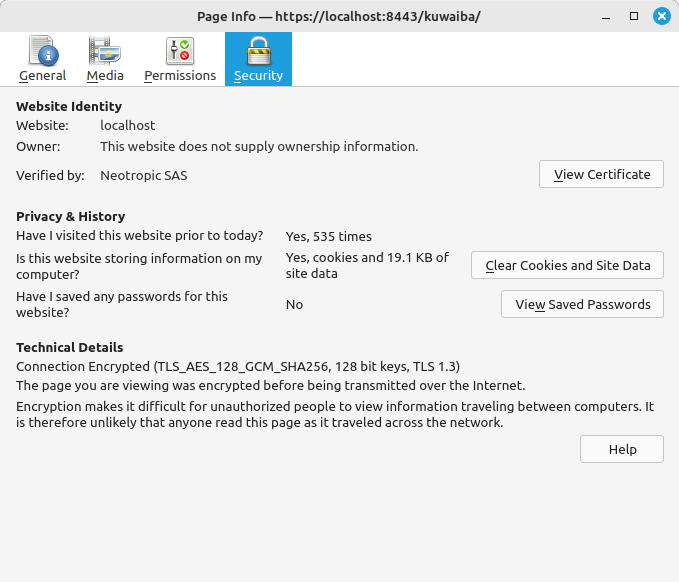
Your certificate:
